Intro
Simply put, Digital Mobile Radio (DMR) has beaten analog systems with its upgraded yet simplified the process of radio communication. Ever since its invention, DMR has revolutionized communication in various businesses and industries.
Features
- Basic equipment
- Better quality audio
- Better coverage
- Longer battery life
- Improved security
Most importantly, DMR users get to benefit from data capabilities like GPS, text messaging, and radio programming.
Basics
DMR Basics – https://www.miklor.com/DMR/ppt/DMR-BasicTutorial.pdf
Basic Voice Radio Operations
Call Signs
Main – Talking to Company Command
X-Ray – Talking to Forward Command
Tango / Oscar – Talking to Mobile Command
Hawk, etc – Talking to Local Unit Command
Radio Check Format
Hawk 1 this is Hawk 2 – Radio Check Over
Hawk 2 this is Hawk 1 – Roger Over
Hawk 1 this is Hawk 2 – Roger Out
Notes
- Transmit as briefly and quickly as possible
- Always use single digits when communication numbers
Glossary
- Acknowledge – I acknowledge your transmission
- Roger – Transmission received
- WILCO – Will comply with orders
- Correction – Transmission was received wrong, re-transmitting new orders
- Negative – Responding to questions where no is required
- Over – Transmission is complete, awaiting response
- Out – Transmission is complete, no response is required (Typically done by person who is starting the convo)
- Out Copy – Transmission is complete, please read back orders to
- Good Copy – Approving transmission that was read back
- Break – A break is a pause is transmission to allow other radios on the net to communicate. It also allows other radios to send urgent messages
- I SAY AGAIN – Have someone repeat back orders to verify they were received correctly
- Repeat – Repeat shooting at previous fire mission
- Disregard – Ignore last transmission and continue with SOP
- Relay – Relay message to another radio on the net
- Code Plug – The software program uploaded to the radio, includes freq’s and encryption keys
Basic Text Radio Operations
DMR radios are each assigned a radio ID or DMR ID. This ID identifies the radio and allow users to communicate directly to each radio. Users may also communicate to a Talk Group to broadcast out orders or information to groups of radios.
Example: Command could push a text to all radios telling them to move to Position Alpha
Manufacturers
Anytone
A Chinese vendor for DMR radios, they provide a quality radio, packed full of features, and at a reasonable price point.
D878UV and D878UVII – Handheld DMR radio with Bluetooth and GPS
D578UVIII – Base DMR radio with Bluetooth and GPS
More Info
http://members.optuszoo.com.au/jason.reilly1/868mods.htm#BandError
Baofeng
A Chinese vendor for Analog and DMR radios. They provide a robust platform for basic radio communications.
DM17801 – Handheld DMR radio
Radios
Anytone D8878UV and D878UVII
Change Base Band
When powering up a new radio for the first time, you will need to check the base band for the radio and set it to the correct band. If you fail to do this the code plugs (programming) will not work on the radio, and the software will not transmit it.
- Open the ATOptions V7 application
- Select the correct COM port
- Read info from the radio
- The radio will reboot, this is normal
- Change the base band to 8 – US Commercial
- Select the correct COM port
- Write info to the radio
- The radio will reboot, into the new base band.
Programming Software
Anytone radios will ship with different firmware versions from the factory. Prior to programming the radio you must verify the firmware version so you download the correct AT software.
On the Radio
- Select Menu
- Select Settings
- Select Device Info
- Scroll down to Model Name and Firmware Ver
- Document Both
On the Computer
- Go to https://www.anytone.net/download
- Download the correct file for your radio
- Look for Official Release for your version
- Install the software and open
- Verify that you have changed the base band prior to connecting radio to software
- Select the correct COM port
- Read from Radio to pull all programming from radio
Baofeng DM-1701
User Manual – Baofeng DM-1701 User Manual
Baofeng Firmware Links – https://www.radioddity.com/pages/baofeng-download
Programming Software – DM-1701 Programming Software
Initial Setup
After receiving a new radio, you must install the USB cable driver, and update it to the latest firmware.
USB Driver – This will allow you to communicate with the device.
Firmware – Some of these radios will sit on shelves for years and can be way out of date. An older firmware will prevent you from uploading and downloading code plugs.
USB Driver
- After downloading the DM-1701 CPS File, copy the USB Driver folder to your computer.
- Run the dpinst_x86.exe application to install the drivers
- Plug in your USB cable and plug it into your radio
- Power your radio on and set the volume to 50%
Update Firmware
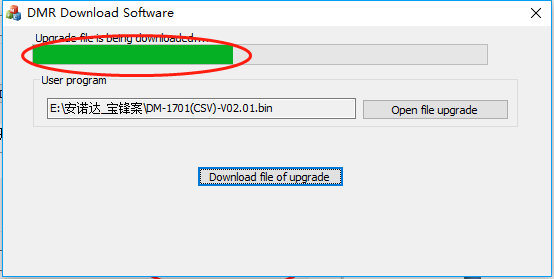
Firmware Update Operation:
1. Install the firmware update program with the file “DMR Firmware Download(User English) Setup v3.06’’ and run the program.
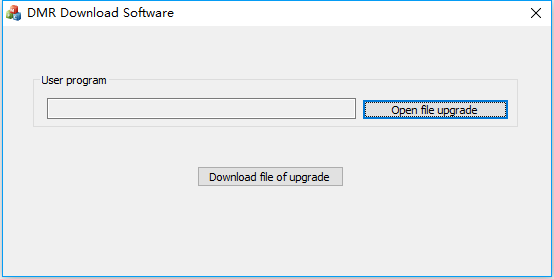
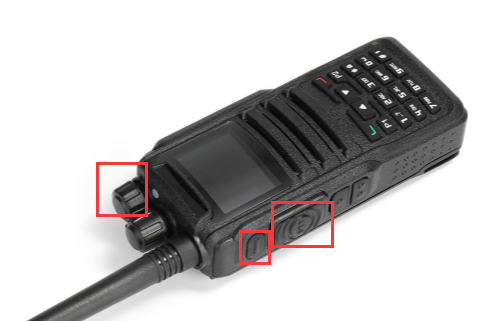
2. Connect the radio to the computer with the programming cable, press and hold PTT + SK1 when turn on the radio, the radio will go into update mode and the Rx/Tx signal light will flash green and red.
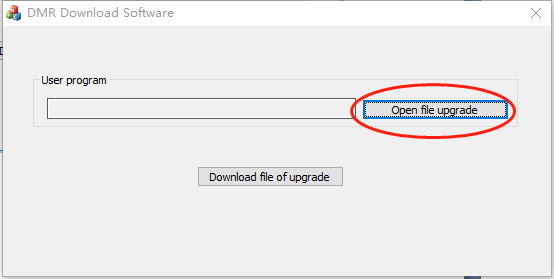
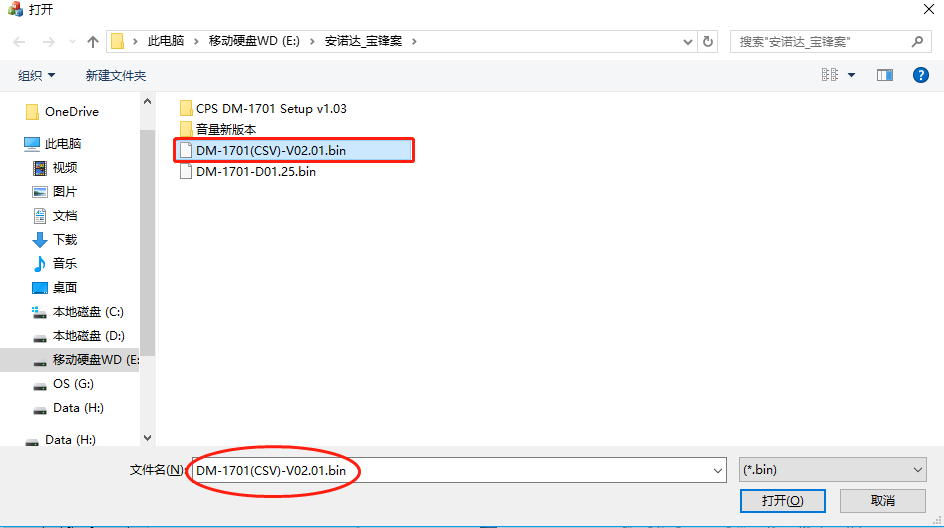
3. Click “Open file upgrade’’ and select the firmware file DM-1701(CSV)-V02.02.bin, then “Download file of upgrade”.

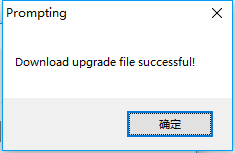
4. After it shows ‘’Download upgrade file successful’’, reboot the radio and the update is finished.
Install Code Plug Software (CPS)
- After downloading the DM-1701 CPS File, copy the USB Driver folder to your computer.
- Run the CPS DM-1701 Setup(English) v1.05.exe application to install the CPS application